

This page contains references to diamonds or engagement rings from different companies. Sometimes I do receive a commission when you click on links and buy the products.
When a diamond is first found, it doesn’t shine, and looks like many other crystalline gems found in the Earth’s crust. There’s no fire to it, no brilliance, nothing that denotes it as one of the most visually impressive gemstones in the world. This is why proper cutting and polishing is the most crucial part of diamond crafting. Without the right approach, we wouldn’t be able to enjoy diamonds as we do today.
The process is complex, difficult, and the stakes are high, as every decision the craftsperson makes ends up affecting the quality, durability, and price of the diamond. So what does this process look like? What does the cutter need to consider? What are the pitfalls? This blog will cover the entire diamond cutting and polishing process, from beginning to end.
- Step One, Part A: Planning a Diamond
- Step One, Part B: Marking a Diamond
- Step Two: Cleaving a Diamond
- Step Three: Bruting the Rough Diamonds
- Step Four: Polishing Diamond Facets
- Step Five: Diamond Inspection
- Step Six: Grading
Step One, Part A: Planning a Diamond
A diamond cutter doesn’t just start hacking away at the rough stone, not without a plan. The initial diamond plan will determine just how valuable the rough stone can be. First of all, the rough stone is measured by what is colloquially called a ‘Sarin machine’.
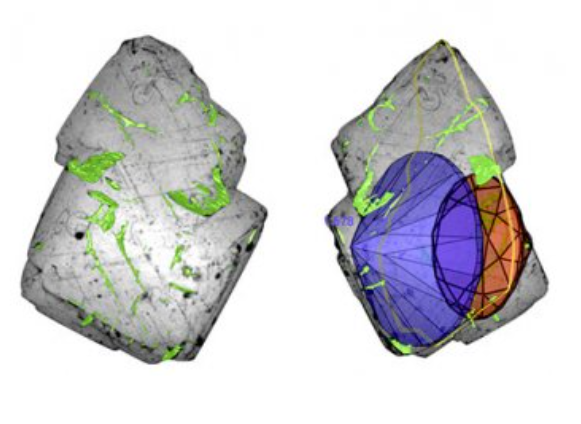 Image credit: Sarine.com
This machine is able to analyze the size, area, and inclusions of a diamond. One of the most popular machines to do this today is the Sarine DiaScan™. The data can be compiled into a 3D model, which is then transferred to a software program called Sarine DiaMension.
Images like the one above are generated, which show the best possible cuts for the rough diamond that maximize the overall yield from the rough stone and minimize waste. You’ll always have some waste from a rough diamond, but an accurate plan helps the cutter determine what size and shape the diamond/s should be.
Discover Your Own Sarine Report
Some diamond retailers include the Sarine report with their sold diamonds. This allows you to see and confirm key data regarding the diamond you’ve chosen in a fashion that doesn’t take years of market experience to understand. One of our favorite diamond retailers, Whiteflash, includes this with every AGS-certified diamond they sell. If you’re interested in seeing the intricate data associated with a diamond, choose from Whiteflash’s extensive range of loose diamonds.
Step One, Part B: Marking the Diamond
Once the plan has been made and the mapping results consulted, the cutter will mark out where they are going to cut. This is one of the most important considerations of a cutter, as they may have to weigh up quality over size. A skilled diamond cutter will almost always cut a diamond down in order to create either one, or several high-quality diamonds. Size should always be seen as a nice-to-have, as a high-clarity diamond with an excellent cut will always be more impressive than a larger, poorly-cut diamond.
The craftsperson will mark the diamond with ink to show where the rough stone will be cut, and then use a tool called a tang to polish the stone.
Step Two: Cleaving a Diamond
Cleaving (also known as sawing) is where a rough diamond is split into pieces that will eventually become fully-fledged diamonds. This will always happen when a rough diamond is being split into multiple diamonds, but is less likely to occur if only one larger diamond is being created.
If a rough diamond happens to be too odd or awkward of a shape to cut mechanically, modern cutting techniques will sometimes utilize contactless cutting tools such as lasers.
Step Three: Bruting the Rough Diamonds
‘Bruting’ is the process by which a rough diamond is rounded into the basic Round diamond shape. This is also called ‘girdling’, in reference to a diamond’s girdle. In most cases, this actually requires two diamonds to be done. Both diamonds will be secured on to two axles that spin against each other.
 Image credit: Cape Town Diamond Museum
The diamonds then spin in opposite directions at high speeds, grinding against each other until a rough, round girdle is achieved.
High-Quality Diamonds At Your Fingertips
I realize better than most that finding diamonds, especially online, that are high-quality and from a trustworthy provider can be difficult. Fortunately, my years in the diamond industry have taught me a few things, so let me make a recommendation.
If you would like to explore some of the highest quality lab diamonds on the market right now, head to Brilliant Earth. They’re widely respected as one of the best online diamond retailers out there for lab created loose diamonds.
Step Four: Polishing Diamond Facets
Diamond polishing is where each individual facet is created. This is potentially the most important part of the overall diamond creation process, as it is where the quality can be added. Sparkle and brilliance come from this step, as a diamond cutter will use their skill to create adequately proportioned facets that allow a diamond to exhibit high levels of light performance.
The rounded but still rough diamond will be secured on a rotating arm, and then polished by a spinning wheel that rotates at very high speeds. This is divided into two parts—blocking and brillianteering:
- Blocking is where eight pavilion mains, eight crowns, one culet, and one table facet are added to the diamond. This is done first as it creates a guide for the next step.
- Brillianteering is where the remaining facets are added. It’s the most complex part and requires a lot of concentration, as each of these facets is what provides the fire and brilliance within a diamond.
This is done individually on every facet, which means it will be done 58 times on average, as this is the standard facet amount for a diamond.
Step Five: Diamond Inspection
After everything, is the diamond up to scratch? No pun intended.
The final step in the diamond polishing process is inspection. The finished diamond is inspected to make sure there are no issues, blemishes, or weaknesses. This is also the point where the cutter makes sure it truly fits the specifications set out by the manufacturer.
If it fails the inspection, it may have to repeat the polishing process in order to resolve any problems.
Step Six: Grading
While this is not actually part of the diamond polishing process, I felt it was important enough to include so that you understand what it takes to get a diamond to market. When a diamond is finished, it is usually sent to a gemological lab, such as the AGS or the GIA, to get graded.
This is where a diamond undergoes rigorous testing in order to ascertain the overall quality. The results are impartial, which means that, not only is the true value discovered, the diamond can be shown to be legitimate, reassuring potential customers. A small word of advice from me, if you’re buying diamonds and they do not have either AGS or GIA certification, don’t buy them.
Finding the Right Diamond For You
If you’re looking for a diamond, either for an engagement ring or for another type of jewelry, you might not know where to start looking. There are countless vendors all claiming similar things, so how do you know where to begin? Well, there’s a reason you’re on this blog.
Through all the diamond retailers I’ve reviewed, these four stand out repeatedly, not only for the quality of their products, but the quality of their service as well. However, if you’re interested in exploring more retailers, head to my diamond retailer review section.

Richard Jenkins, The Diamond Guru
Get free assistance from the Diamond Guru today. You’ll be glad you did!
- Secure the best quality diamond for your budget.
- Don’t pay over the odds for your diamond ring.
- Have peace of mind that you didn’t get ripped off.
Have a Question? Contact us now…